![[Land List Home]](pics/nav-home.gif)
![[Camera List]](pics/nav-dcam.gif)
![[Accessory List]](pics/nav-acc.gif)
![[Film List]](pics/nav-film.gif)
![[FAQ]](pics/nav-faq-inv.gif)
![[More!]](pics/nav-more.gif)


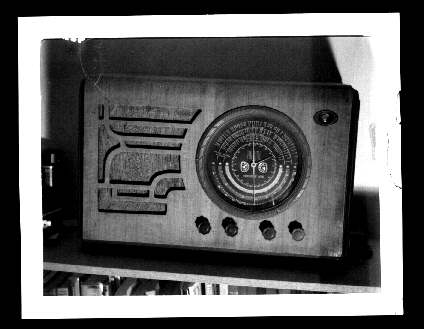
Okay! Here's one way you can use modern packfilm in an old Polaroid rollfilm camera! While this isn't exactly convenient, it's something at least. ...And it doesn't require any modifications to the camera itself. It is, emphatically, not intended to be a substitute for true packfilm conversion-- the technique detailed here is probably not something you'll want to go through every day, and is really only designed for hobbyists who just want to take a picture or two with their 'classic' Polaroid camera.
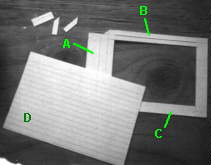
What you'll need:
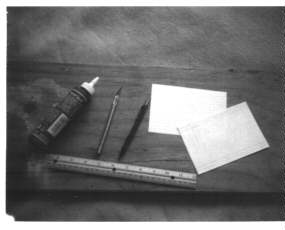
To make one, you'll need two 4x6 inch index cards. You could use any light cardstock cut to 4x6 inches (10.2 x 15.2 cm), but ordinary (at least in the USA) 4x6 index cards are just about perfect for the job. You'll also need some white glue, a small hobby knife (an X-acto knife or similar), a ruler/sraightedge, and a pencil.
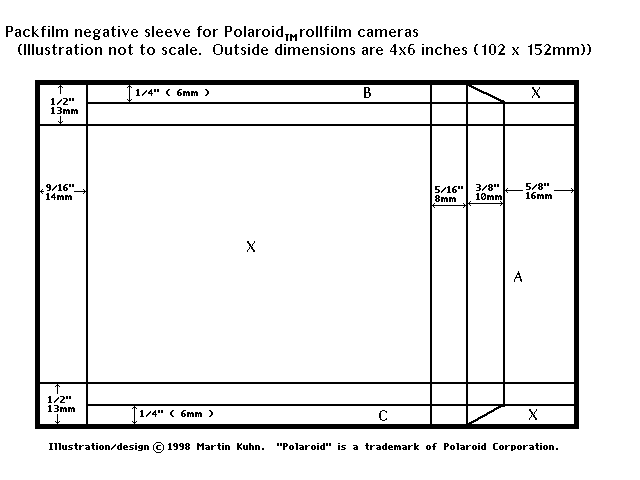
Use a ruler and a pencil to mark the lines described in the illustration on one of your index cards. The three regions marked with an "X" should be cut out-- do not cut on any of the other lines! While the large rectangular area should only be cut out on this one card, the two small notch-shaped areas need to be cut on both cards, so you might want to stack the two together before cutting the notches.
ASIDE: Actually, for most people, only the large rectangular region needs to be cut away. The two notches only need to be cut out if you're going to use the sleeve in an original Model 95 or an early production 110 Pathfinder (the ones with the film spool clips). However, you'll probably want to cut out the notches anyway, because they'll also help you orient the sleeve correctly when handling it in the dark (as you'll see in Section 2).
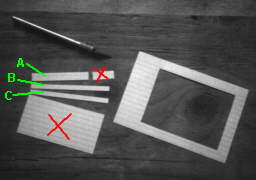
Use the large rectangular piece of cardstock you just cut out to make three strips as shown. Cut along the long side of the rectangle. Two of the strips should be 1/4" wide (labeled B and C in the picture). The dimensions of the third one (A) aren't critical-- just as long as it's no more than 5/8" in width. NOTE: If you're using standard ruled 4x6 cards, the lines printed on them are usually 1/4" apart.
Glue the three strips to your marked-up card so as to cover the three regions labeled A, B, and C in the template. You'll have to cut down the length of the A strip so it'll fit-- the exact length isn't critical. However, be sure that one long edge of the A strip is placed exactly along the inside line of its region. Once you've glued down the three strips, complete the sleeve by spreading glue on top of the strips, and placing the other card (D) down on top of the assembly. [If you already cut the notches out of both cards, obviously you should make sure you orient the cards so that they line up.] Be sure not to get any glue on the inside of the sleeve!
Now you should have a cardboard "envelope" with one side open.
Wait for the glue to dry, and let's try to make a picture!
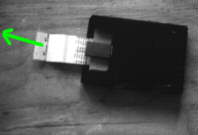
First, you'll need to remove a film sheet assembly from a Polaroid film pack. Probably the easiest way to do this is to start pulling the top (closest to the back side) white tab out of the pack-- just as if you were about to develop a picture-- and then carefully pull the yellow tab as it pops out until the entire picture assembly is out of the film pack. If this is a new pack of film, of course you'll have to pull the black light-tight safety cover out of the pack first. Incidently, you may find it very helpful to try to leave the white tab attached to the film, as it can be used as a reminder of which side of the film "sandwich" has the negative.
TIP: If you have an extra packfilm camera, just keep a pack of film loaded in it, and you can pull out individual sheets any time you want. In total darkness, open the back of the camera and pull the white tab as directed above. Make sure you do this with the back open! If you pull the tab with the back closed so that it passes through the development rollers, you'll end up wasting unexposed film.
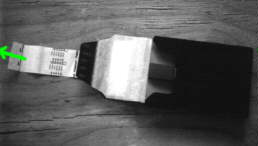
The above image illustrates the sections of the film "sandwich":


Once you have the film out of the pack, slip the negative side of the film into the sleeve with the image side towards the open face of the sleeve. Note that the image side is the one on the inside of the film "sandwich", and that the negative is on the sheet on which the white tab is attached. You can also detect the negative sheet in the dark by checking the stiffness of the two sheets-- the postive side is stiffer, since it has the actual receiving paper for the print. Once you have the negative inserted all the way into the sleeve, just let the postive side hang out the end.
TIP: If you plan to do this a lot, you might want to make several extra film sleeves and just load up a whole pack's worth at one time. Keep the loaded sleeves in a light-tight box and you'll be all set!
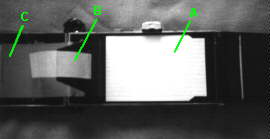
First, open the back of the rollfilm camera fully, and place the loaded sleeve in the film plane. Let the white tab and positive sheet drape straight out to the side to ensure that they aren't caught under the negative.
Second, close the inner flap of the camera over the sleeve. The white tab and positive sheet still extend out to the side. Make sure the development pod isn't caught under the roller.
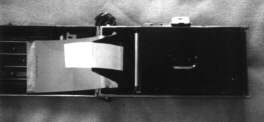
Now just fold the positive side over the flap, and close the back of the camera. Now go out and take a picture!
TIPS: Be careful that the action of folding the positive over doesn't cause the negative to be pulled part way out of the sleeve. The placement of the development pod makes this likely. It's probably a good idea to compose your pictures to avoid having important details in the extreme left side because of this possibility. Another way around this problem might be to fold the positive over directly on top of the sleeve, thus placing the entire assembly between the inner flap and the film plane. I do wonder if this alternate technique may increase the chances of crushing the development pod accidently (since it would now be under the pressure plate), and it may also affect the film flatness. However, if you try it, let me know which works out better for you!
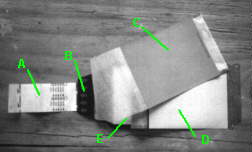
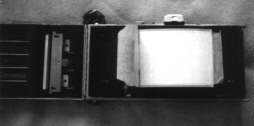
After you take the picture, go back to your darkroom or changing bag and unload the camera. You can leave the negative in the sleeve, and you may find that this makes the assembly easier to handle (as well as prevents getting fingerprints on the image). Now, open up the back of the pack camera you're using for the development process.
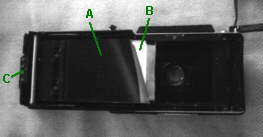
With the back of the camera open, orient the film assembly so that the negative (A) faces you (the positive side (B) should face the back of the camera). Remove the white tab if it's still attached to the back of the negative. Slide the yellow tab (C) between the development rollers and out the tab door. Don't pull the yellow tab all the way through yet! Just slide the tab through so that the development pod is just in back of the rollers (you'll feel a resistance at this point). If you're using a folding packfilm camera, you'll note that there are two small metal guide tabs just in front of the rollers. The film assembly goes behind those tabs (i.e. between the guides and the back of the camera).
Make sure that the picture assembly is as straight as possible. If it's crooked, you may wind up with undeveloped areas (or even rip the film entirely) when you pull the yellow tab.
Now you have a choice-- you can either finish the development right now by pulling the yellow tab, or you can close the back cover (slide off the film sleeve if it's still on, and carefully fold the film assembly as you close the back) and perform the actual development in the light. If you're using a changing bag and/or are trying this technique for the first time, you'll probably want to develop the film in the light. If you're in a darkroom and already have had some practice, well, go ahead and pull the tab in the dark with the camera still open if you want.
In either case, I must repeat-- make sure the film is headed straight out the rollers before you pull the tab! This is easier to check if you close the camera and turn on the lights first so you can see the yellow tab as it sticks out of the slot. If it's noticably at an angle, you can easily correct it before pulling the tab.
Ready? Now pull the tab!
Wait the required development time according to the film instructions...
...And peel away the positive print!
How'd it turn out? :-)
DISCLAIMER: Needless to say, I'm not to be held responsible
for loss of film, equipment, bodily injury, or other damage caused by
following the information on this page. These instructions are provided
as-is and no warranty is expressed or implied. Have fun, but use at your
own risk!
Also, if you give this technique a try, let me know how it worked out! If you have any questions or suggestions for improvements, let me know. For one thing, it'd be nice to be able to process the film in the rollfilm camera itself (using the rollfilm camera's rollers), thus simplifying the operation, but I haven't worked out a solution yet.
![[FAQ]](pics/nav-faq.gif)
"Polaroid", "Land Camera" and other camera names are trademarks of Polaroid Corporation. No endorsement or approval by Polaroid Corporation is implied, nor is Polaroid responsible for the accuracy of the content of this web site.
Contents Copyright © 1998 by Martin (Marty) Kuhn /
mkuhn@rwhirled.com
All Rights Reserved Worldwide
Land List Legal / Privacy Info