![[Land List Home]](pics/nav-home.gif)
![[Camera List]](pics/nav-dcam.gif)
![[Accessory List]](pics/nav-acc.gif)
![[Film List]](pics/nav-film.gif)
![[FAQ]](pics/nav-faq-inv.gif)
![[More!]](pics/nav-more.gif)


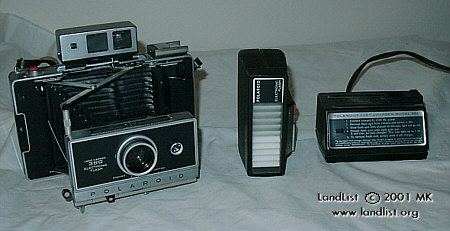
One of the best classic automatic packfilm cameras out there is the Model 360, and one reason for its popularity is that it's the only classic Polaroid pack camera to come equipped with an electronic flash. Unfortunately, after all these years, the rechargeable NiCad batteries in these flashes are usually 'dead' and unable to hold a sufficient charge to operate the flash.
Also, unfortunately, Polaroid corp didn't exactly make it easy for the owner to replace this built-in battery pack themselves. So, herewith are some tips for the hobbyist who would like to try such a replacement themselves.
One other thing: keep in mind that there is a possibility that dead NiCad cells aren't the only problem with your flash, so you may still end up with a dead flash after all of this work.
By the way, one additional annoying problem with disassembling
this flash in particular is that doing so will probably result
in permanent cosmetic alteration to the flash. In other words,
it probably won't look as good as it did before you started.
If your only interest is to have a functional electronic flash,
this might not matter to you.
Where can you get these sizes of NiCad cells? You probably won't find them at your local discount store, but you should be able to find them at one or more of the following:
From looking through various catalogs, "2/3 C" NiCd cells appear to have a capacity of about 1000 mAh, while Sub C's are about 1200-1300 mAh. Thinking this over again, one thing that crosses my mind is that high-capacity 'AA' NiCd cells are available in capacities of at least 850 mAh, and since they're capable of considerably higher charge rates than standard 'AA' NiCads, they'd probably have no trouble absorbing the level of current provided by the charger. They'd also be easier to find than the 2/3 C's and Sub C's, and should fit in the flash's battery compartment. They'd still not last as long as the cells intended for the flash, but that shouldn't be a bad trade-off. I'd be somewhat concerned about the charger possibly overcharging the AA cells, but other than that I can't see offhand why this substitution wouldn't work. (any thoughts?) Of course, if you do try this, it's all still at your own risk...
By the way, do not substitue NiMh (Nickel-Metal-Hydride) or other types of rechargable cells for the NiCad (Nickel-Cadmium) ones, though-- I don't know about this particular case, but a lot of chargers designed for NiCads just plain don't work well (or at all) with NiMh cells.
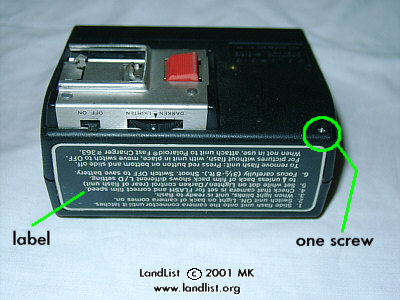
You've probably already taken a good look at the flash by now, and so you've also probably noticed that there's only one visible screwhead anywhere on the flash. If you already tried removing that screw, you probably noticed that doing so didn't seem to accomplish much in terms of getting the %$@#%*! flash to open.
Well, you're right. There are two other screws that need to be removed. Unfortunately, they're hiding behind that big instructional label on the back of the flash.
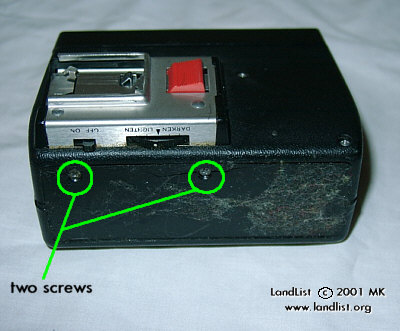
You have two choices. You can either remove the entire label (which will almost certainly get bent and creased in the process so that it will never lie flat in its original position ever again-- assuming it comes off in one piece), or you can cut two sections out near the bottom of the label just large enough to gain access to the original screws (which will leave you with two big holes in the label). Take your pick-- either one will probably ruin the label, but unless someone has a better idea, I guess that's just the price of having a functional flash again.
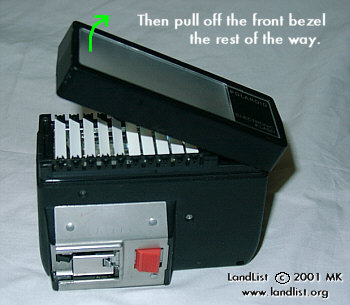
Now, you've exposed the two screws and removed them. ...But the flash still won't come open! Sorry-- you're not done yet. Direct your attention to the front of the flash. Pull on the front bezel until it pops off. This will take a certain amount of force. Try wiggling the now-loosened top cover while pulling on one side of the front bezel. If you can't loosen it that way, you may have to pry the bezel off with a screwdriver or putty knife (and possibly causing even more cosmetic damage to the flash). Don't get too wild, though, because once you've removed the bezel, the white plastic panels in the louver ('focused flash') assembly will be exposed-- these may easily loosen and fall out of the flash. If that happens, reassemble the louver panels before continuing.
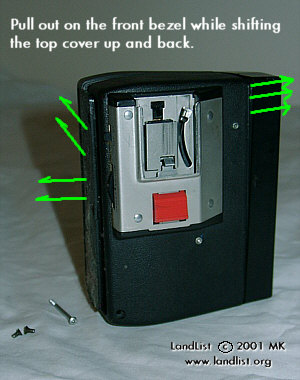
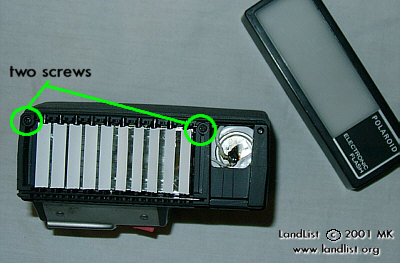
Now, you'll have access to two more hidden screws. Remove them, and finally-- you can remove the top panel of the flash. Whew! Obviously, the Polaroid Corporation didn't want their customers monkeying around with the inside of this electronic flash, that's for sure!
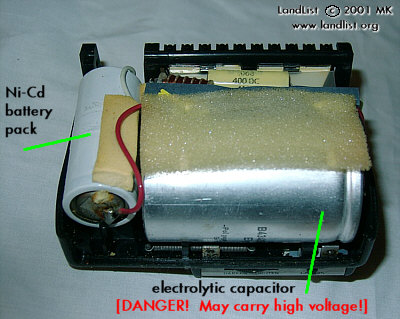
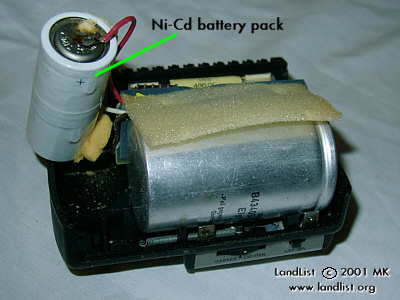
Now that you've got the flash open, you should be able to easily spot the battery pack (on the left) consisting of two 2/3 C-size NiCad cells connected together. You'll note that, at least in the case of my flash, they're also wrapped in plastic shrink wrap. The large metal can visible in the foreground is the flash capacitor. Do not touch the terminals of the capacitor, as this may carry in excess of 300 volts. Other parts inside the flash may also carry high voltage as well, so you'd do well not to touch anything except the battery pack.
Most anyone who should be attempting this operation should already know what to do at this point, but just as a review:
Two things:
One: Unfortunately, there is a definite possibility that the flash still won't work even after you've replaced the Ni-Cd cells. If the flash makes the usual high-pitched whine when you switch it on (thus indicating that the batteries are charged and good), but the ready light never comes on, the problem may be the flash capacitor is 'leaky' or partially shorted. This is a common ailment in old electrolytic capacitors. If the capacitor isn't too bad, then the flash may still be able to fire (at a somewhat diminished level) even if the ready light never comes on. I would not attempt a capacitor replacement unless you know exactly what you are doing. Improper replacement of a flash capacitor may cause electrical shock, explosion, or any number of Bad Things.
Two: Say, here's a thought: How about replacing the original two-cell Ni-Cd battery pack with a pair of regular alkaline AA's or C's..? A plastic battery holder could be mounted to the top cover of the flash using double-sided foam tape. This would be particularly useful in situations where the original battery charger is missing or damaged. Naturally, if you replace the original Ni-Cd batteries with regular primary (i.e. alkaline) cells, make sure you never try to attach the flash to the charger!
![[FAQ]](pics/nav-faq.gif)
"Polaroid", "Land Camera" and other camera names are trademarks of Polaroid Corporation. No endorsement or approval by Polaroid Corporation is implied, nor is Polaroid responsible for the accuracy of the content of this web site. All information is provided on an 'as-is' basis; the author of this site is not liable for damages of any sort (financial, physical, or otherwise) which might arise from the use (or misuse) of information on this site.
Contents Copyright © 1992-2002 by Martin (Marty) Kuhn / mkuhn@rwhirled.com
Land List Legal / Privacy Info